There’s no denying that photovoltaic (PV) systems are a great renewable energy resource, but they do need regular attention. As with any piece of equipment someone owns, there is a level of inspection and maintenance that must be performed in order to keep that system operating in optimal condition. Without proper maintenance, bad things can happen. Issues in the modules or on the balance of system can cause a loss of energy. If there is a problem that goes undetected, it can lead to a fire.
After many years of owning a PV O&M company, the thermal imager has become one of the most critical pieces of equipment pulled from this author’s tool box to diagnose the health of an installed PV system. Not only is the thermal imager used to inspect PV modules and identify problems, but it is also beneficial for troubleshooting the inverter, combiner boxes, and system disconnects.
As with any thermal imaging tool, you need to understand what you are looking at to properly interpret the results. Therefore, you should have a working knowledge of the equipment to understand the measurements. The thermal scanning that is conducted does not just look at the installed photovoltaic panels but also at the other electrical equipment associated with the photovoltaic panels. There are certain elements that need to be taken into consideration when conducting the thermal scan. Let’s take a look at some of the most important ones.
Seeing is believing
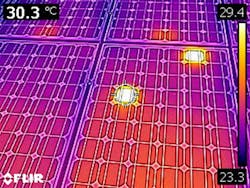
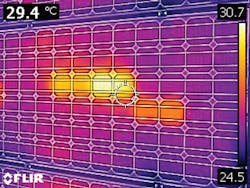
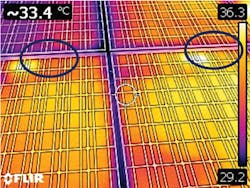
When conducting a thermal scan of the panels, you are able to identify: hot spots on cells of a panel (Fig. 1; Fig. 2a and 2b); properly operating or failed diodes (Fig. 3); or major dirt/staining on a panel. You can see the junction boxes (located on the underside of the panels) and know they are working because they have a higher heat signature (Fig. 4). Inside of the combiner boxes, you are able to see if there is a hot string entering the combiner box or if there is a dead string. This can indicate either the bolted connection is not torqued properly (Fig. 5a and 5b) or a production issue. You can also see inside of system disconnects and note if a line is overheating. On the inverter, you can tell if you have proper ventilation occurring. You can also determine if an inverter is not producing what it should be in comparison with the other inverters in the area.
Believe it or not?
When the author’s company conducts thermal scans of a system, it does a preliminary analysis to see if there are any anomalies. This step helps pinpoint items that are truly not problems (Fig. 6a and 6b). When determining the authenticity of a hot spot, a more in-depth analysis needs to be conducted. For example, one of the first hot spots that comes up, which is not a problem, might be bird droppings (Fig. 7a and 7b), tree sap, dirt, etc.
A key factor to keep in mind with all thermal imagery work is you must be aware of your surroundings, paying careful attention to shadowing (Fig. 8a and 8b). You always want to take a couple of images from different angles to see if it is truly an anomaly. When thermal scanning any of the equipment, you need to note your irradiance at the time of the scan. On a solar panel, you will need to shoot the panel’s hot cell and surrounding cells to find the differential temperature (Δt) because this is going to let you know if it is a serious issue or not.
Based on the author’s experience in the field and in working with panel manufacturers, here are some of the basic guidelines. Each manufacturer has its own specific documentation that will be required. The examples used here are common with most panel manufacturers.
Panels
- Under 10°C, Δt is not a major issue.
- Greater than 10˚C, Δt should be examined to see if there is anything that might be causing this issue. Further action will need to be taken (those steps are stated below).
Inside of a combiner box and a service disconnect
- Under 2˚C, Δt is not a major issue.
- Above 2˚C, Δt needs to be addressed.
Combiner boxes
- Torque specification was not properly met.
- The string is a higher performing string and can cause heat.
- The string has failed and is no longer producing (this is when you see a cold line) — this can be caused by a string being disconnected. Blown fuse in the combiner box.
Inverters
- Inverter ventilation covers not properly sealed.
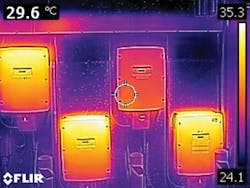
- Unit is not operating (Fig. 9).
- Poor ventilation (externally or internally such as the intake screens or blocked or a failed fan).
- Unit has a problem with the PV system not performing as designed and is under producing.
Inverters are a bit different because the thermal scans are comparative with side-by-side inverters to ensure proper cooling is taking place on the equipment or if one unit is not working. You are doing the thermal scan on these units as if looking for a leak and making sure the heat is being dissipated properly.
What’s the fix?
Always perform a full visual inspection, and document what is seen. Then continue with the further testing.
PV panels
1. Map out the location, and identify the string number it is associated with (do this with all hot spots found).
2. Identify what might have caused the hot spot.
These next steps are if the panel is greater than 10°C Δt from comparative cells on the same panel.
3. Take a minimum of three thermal images from various angles and be sure to have irradiance readings.
4. If there is a replacement panel, change that panel out of the system.
5. If no replacement is available, start the warranty claim process with the panel manufacturer.
6. Always inform the customer of the situation, shut the string down, and wait to see if the manufacturer warrants it to be replaced.
7. If there are obvious burn marks, immediately shut down the system.
Combiner box
1. Note the string and what system it is on.
2. Visibly inspect the area to ensure the wires are not damaged and there are no obvious issues in the box.
3. Test the fuse to ensure the fuse has not blown.
4. Perform system checks on the string, including voltage and current readings, and note the irradiance at the time of the check. This will be a good comparative analysis with like strings under the same condition going to the combiner box. Some strings will have a greater current, and that can be the reason for the hotter temperature.
If these steps don’t identify the problem, then proceed with these next two items.
5. Perform a torque check on all the strings, and ensure they meet the torque specifications on the box.
6. Upon completing these steps, turn the system back on and let it run for at least 15 minutes. Then perform a new thermal scan to see if this has cleared up the problem. It is critical to capture the irradiance again, as this is directly related to the temperature of the string.
Inverters
1. Check to ensure the unit is running.
2. See if there are any physical items blocking it.
3. Verify the strings and system energy going to that inverter.
If a major issue is found during your inspection, contact the manufacturer and provide them with the following:
- Site name
- Site address
- Your contact information
- Serial number of the panel or piece of equipment
- What exactly was found (if there is a large Δt, burn mark, no visible signs, or any significant items)
When is the best time to perform a thermal scan?
The ideal conditions for conducting a PV system thermal scan are:
- The system needs to be operating with no fault conditions.
- Irradiance is greater than 600 W/m2.
- Weather condition is stable.
- Full knowledge of the installed PV system.
- Have the system layout and mapping work done prior to performing the thermal inspection.
Panels are tested under certain test conditions 25°C, at 1.5 Atmosphere condition (which you will not have any control of), and at 1,000 W/m2. Since the atmosphere condition is going to be a constant at your location — and you are going to be doing a comparative analysis — it’s critical to get the temperature and the irradiance at the time of the reading.
Remember, it’s possible to find thermal anomalies in low light conditions. The author’s company has found anomalies on systems with irradiance as low as 200 W/m2 coming to the panels, but better results come with higher irradiance.
Brooks is the owner of Pacific Panel Cleaners LLC in Honolulu, Hawaii. He can be reached at [email protected].
SIDEBAR: PV Terms to Know
Photovoltaic — The ability to produce electricity from the suns radiant energy. This is also known as PV.
Panel — The term used for each individual solar panel in a PV system.
Cell — A block inside of the panels. Panels have up to 96 cells, but average numbers are 60 and 72.
Diodes — There are two types: bypass and blocking. The bypass diode allows current to pass through a damaged cell; a blocking diode stops current from flowing backward.
String — A series of panels in a row all connected.
Combiner box — The location where all of the stringcurrent is combined.
Inverter — A unit that transforms (inverts) the PV panel DC into AC.
Irradiance — Measurement of the sun’s energy striking the earth’s surface and the PV panels surface measured in watts per meter squared (W/m2).


