There are many vital components to successful estimating, but consistency is certainly one of them. Establishing an estimating process is a great way to standardize the steps required to produce quality estimates. Let’s look at what’s involved in delivering a solid estimate.
Step 1: Obtain contract documents.
Most documents today are delivered electronically. Download project documents to a designated location on your company’s server. Some contractors find it helpful to use a New Project Folder Template with folders. If printed sets of project documents are available, obtain all drawings, specification books, and pre-bid issued addendums.
Step 2: Organize your estimate.
Create an estimate number. Although this may not apply to every electrical contractor, some contractors find it best to keep a numerical record of their estimates. An estimate number can be used in your estimating program, file structure on your server, and in an estimate log.
Set up an estimate three-ring binder. An estimate of any size should have an estimate binder. When working on smaller service-type projects, a manila file folder will suffice. This approach will keep your work organized and readily available for review.
Add the pre-bid meeting date, bid date, and meeting times to your calendar(s). It doesn’t matter what type of calendar you use (e.g., wall calendar or Microsoft Outlook). Just make sure you use one.
Create your own numbering system for the electrical drawings. Many engineers use a series of drawings (e.g., E100, E101, E102, E200, E201, E202, E300, E301, E302, etc.), whereas you might use a simplified reference (e.g., E1, E2, E3, E4, etc.). Before separating the drawings to do your take-off, number them in the lower right-hand corner of the drawing block. This will make it easier to put the drawings back in their proper order after you’ve worked with them for a while.
Step 3: Submit bonding request, if applicable.
When the electrical contractor has a contract directly with the owner in lieu of being a subcontractor to the general contractor, a bid bond is sometimes required. Most bonding companies will require some basic information about the project, such as approximate value, start date, completion date, and liquidated damages. Most of this information can be found in the project specifications. The architect or electrical engineer should be able to provide you with the approximate value of the project. If not, you’ll need to provide the bonding company with an approximate budget.
Step 4: Perform project reviews.
Determine how long it will take to complete the estimate. A good rule of thumb is three hours per drawing. Multiply the number of electrical drawings (less detail drawings) by three hours. This should establish the approximate total number of hours required to complete the estimate. This time includes reading specifications, sending out material requests, and entering a complete takeoff into your estimating program.
Review the bid form. The bid form or bid proposal will indicate the prices required for a complete bid submission. There is typically a base bid price, and sometimes an architect may request alternate pricing for selected portions of the project. You must do this before beginning any material takeoffs.
Review Divisions 0 and 1 of the specifications. The “Invitation to Bid” section will provide you with the bid date, time, and location and method of bid delivery. Your goal as an estimator is to identify all items that will affect the estimating and bidding processes for your company. Here are some basic items to take note of: completion date, works hours, liquidated damages, allowances, and bonding/insurance requirements. You must also identify any phasing requirements on the project.
Carefully read the General and Supplemental Conditions and the Summary of Work. Coordination with other trades and items provided under other contracts must also be identified. A careful review of Division 1 should provide you with requirements for temporary power and temporary generation for any power shutdowns. Since owner furnished equipment (OFE) can be labor-intensive, it must be clearly identified. For example, some owners will furnish lighting fixtures through a national account. These fixtures may require assembly or need additional hardware for installation. Owner-furnished generators may have to be transported from a remote location to the project site. If the owner is providing selected equipment, be sure to clarify your responsibilities.
Identify any concerns related to schedule, phasing, and completion date with your chief estimator. If the risks are too great, the two of you might decide it’s in the best interest of your company to pass on this particular project.
Review Divisions 26, 27, and 28 of the specifications. Make note of any specific wiring methods mentioned. Identifying acceptable wiring methods is vitally important. You must identify conduit types and uses, wire and cable types, and hardware material type such as zinc, galvanized or stainless steel. In addition to power wiring, you also need to identify the wiring method requirements for fire alarm, security, data, and sound systems.
Take note of the following information with regard to the site, landscape, structural, and architectural drawings: utility connection points for power and communications, contractor staging areas (for temporary power requirements), site lighting, and landscape lighting.
If the specifications allow for conduits to be installed in the slab, then the grade slab and floor slab thicknesses must be known. The framing construction is also important. Buildings can be steel structure, poured concrete, or some other type of construction. When working in a building that is using poured concrete construction techniques, your conduits will be embedded in the poured walls or slabs. If the building is a multifloor design, you must make note of the distances between floors.
Identifying interior wall partition types will tell you what types of boxes and other wiring methods should be used on the project. Ceiling types and heights are also important. A gypsum wall board ceiling may require access panels whereas an acoustical ceiling tile (ACT) ceiling will not. Where ceiling heights are above a typical 8-ft height, you’ll need to add in the cost of working from scissor lifts to complete the work. You should also identify chase ways for feeder conduit routing.
All of these findings should be marked on the electrical drawings. This process will allow you to fully understand the building’s construction type before you begin to prepare your estimate.
Step 5: Set up project in your estimating program, unless using manual estimating.
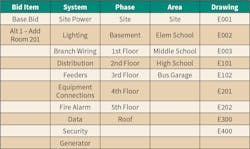
Most estimating programs allow you to structure your take-off. This structure has various names based on estimating software program you’re using. It may be referred to as labels, breakdown, or take-off tree. The estimate structure is very powerful and important when creating an estimate. It is vital that you know how the project breaks down by system, floor, area, and phase. Here are five ways in which you could break down the estimate:

• Bid Item — This should be the base bid and any alternates you come up with. This will allow you to break out any add or delete alternates. List your alternates as follows: Alt #1 – Add Cable Tray. Giving your alternates their appropriate number and description will help you keep things straight when doing your take-offs.
• System — This would include any of the systems on the project. In addition to those listed in the Table, some project systems might include: demolition, nurse call, code blue, heat tracing, snow melt, cable trays, electric heat, or area of rescue.
• Phase — This can be used for different floors on the project. Projects with sections that will be completed at various times will require a phase breakdown.
• Area — If you are bidding a project that has multiple buildings, you can use this area to identify each building on the project. In addition, you can use this breakdown to identify an area within the building such as an auditorium or gymnasium.
• Drawings — Breaking down a project by drawings can be very helpful. This is especially true if the drawings break down a project by areas. This will allow you to know labor hours per area. A sample estimate breakdown is shown in the Table.
The preliminary steps in the estimating process are important. You must start right to finish right. Get the documents, organize the estimate, perform project reviews, and set up your estimate in an estimating software program. Once this work is complete, you will then be ready to perform systematic and accurate take-offs.
In part two of this three-part series, we will cover five steps to performing a quality take-off.
Kiper is an independent electrical estimating consultant based in Niagara Falls, NY. He can be reached at [email protected].
About the Author
Don Kiper
Independent Electrical Estimating Consultant
With more than 35 years of experience as a construction electrician, industrial maintenance electrician, foreman, estimator, estimating manager, and project manager, Don has used what he learned to lead in the implementation of estimating software with three electrical contractors where he has worked. Don has 17 years of experience in the construction field and 18 years of office experience and he has personally estimated over $700 million dollars in electrical projects.